User guide · version 1.0.0
Sillage Studio
Prepare, edit and assemble your GPX tracks on Windows, segment by segment, without ever touching your original files.

Contents
- 01Introduction
- 02Installation and launch
- 03Getting to know the interface
- 04Importing and viewing GPX files
- 05Display, markers and colors
- 06Creating a track
- 07Editing points
- 08A/B portions, cutting and deleting
- 09Reversing direction
- 10Merging tracks
- 11Undo, redo and shortcuts
- 12Exporting and preserving your files
- 13With or without Internet
- 14Settings and data
- 15Troubleshooting
- 16Formats and limits
- 17About and contact
- 18Credits and licenses
Introduction
Sillage Studio is a free Windows application for preparing, viewing, editing and manually assembling GPX files. It is designed in particular for planning trail or enduro motorcycle, quad and 4×4 rides: import tracks, compare them on a map, fix points, cut or reverse a portion, then assemble several tracks into a new route.
The application is published by Soft_Logic. It requires no account, no activation and no Internet connection to start.
Sillage, Ornix and Sillage Studio
Sillage Studio complements two Soft_Logic Android apps. Each has its own role; GPX files move between them as ordinary files, with no automatic synchronization.
| Application | Platform | Role |
|---|---|---|
 Sillage | Android | GPS recording and GPX track creation |
 Ornix | Android | GPS navigation and use of tracks |
| Sillage Studio | Windows | GPX preparation, editing and assembly |
Vocabulary
- Document: an imported GPX file, or a track created in the library.
- Track (
trk): a recorded path; one document can contain several. - Segment (
trkseg): a continuous part of a track. Two segments are never joined automatically. - GPX route (
rte): a sequence of route points, displayed separately from tracks. - Waypoint (
wpt): a standalone named point. A track or route point is not a waypoint. - Complete route: in commands, means the whole selected document, not just one track.
Installation and launch
Sillage Studio 1.0.0 is distributed as a portable ZIP archive, published on the official page softlogics.net/sillage-studio.html. Distribution through the Microsoft Store is planned but not published yet.
Portable ZIP version
The archive is named SillageStudio-1.0.0-win-x64-portable.zip. Only download it from the official page softlogics.net/sillage-studio.html, which also shows its SHA-256 checksum.
- Extract the entire ZIP into a local folder (right-click → Extract All…). Do not run the application from inside the ZIP.
- Open the
SillageStudio-1.0.0-win-x64-portablefolder and runSillageStudio.Desktop.exe. - Do not move the executable on its own: it needs the DLLs and neighboring subfolders (
MapAssets, languages,Licenses…). For a shortcut, use right-click → Send to › Desktop.
| Item in the extracted folder | Purpose |
|---|---|
SillageStudio.Desktop.exe | The application, to run |
.dll files and runtimes folder | Included .NET 10 runtime and libraries |
MapAssets | Embedded map (MapLibre GL JS, styles, icons) |
Licenses | License notices for third-party components |
cs, de, fr, zh-Hans… | Language resources of .NET components (the Sillage Studio interface is in French and English) |
- The .NET 10 runtime is included: no .NET SDK or runtime to install.
- No administrator rights are needed, and the application folder does not need to be writable.
- The Microsoft Edge WebView2 runtime is required (see WebView2).
Check the archive integrity (optional)
A .sha256 file accompanies the ZIP. In PowerShell, from the download folder:
Get-FileHash -Algorithm SHA256 -LiteralPath '.\SillageStudio-1.0.0-win-x64-portable.zip'Compare the displayed hash with the contents of the .sha256 file. A matching hash confirms the archive is intact; it does not replace an official download source.
Windows requirements
- Current distribution: Windows x64 only (no native ARM64 or x86 edition).
- Windows 11 x64 in a supported version is recommended.
- Windows 10: support depends on the edition and Microsoft’s .NET 10 support lifecycle; see Microsoft’s documentation. No general compatibility is claimed.
Microsoft Store (planned)
Distribution through the Microsoft Store is planned. The Store listing is not publicly available yet, so this guide provides no Store link or installation steps. They will be added after official publication.
Microsoft Edge WebView2
The map and GPX drawing rely on the Windows component Microsoft Edge WebView2 Evergreen. It is required even in offline background mode. It is often already present on Windows, but is not included in the ZIP.
If it is missing, Sillage Studio says so in the status bar (WebView2 Evergreen missing) and shows a message above the map:
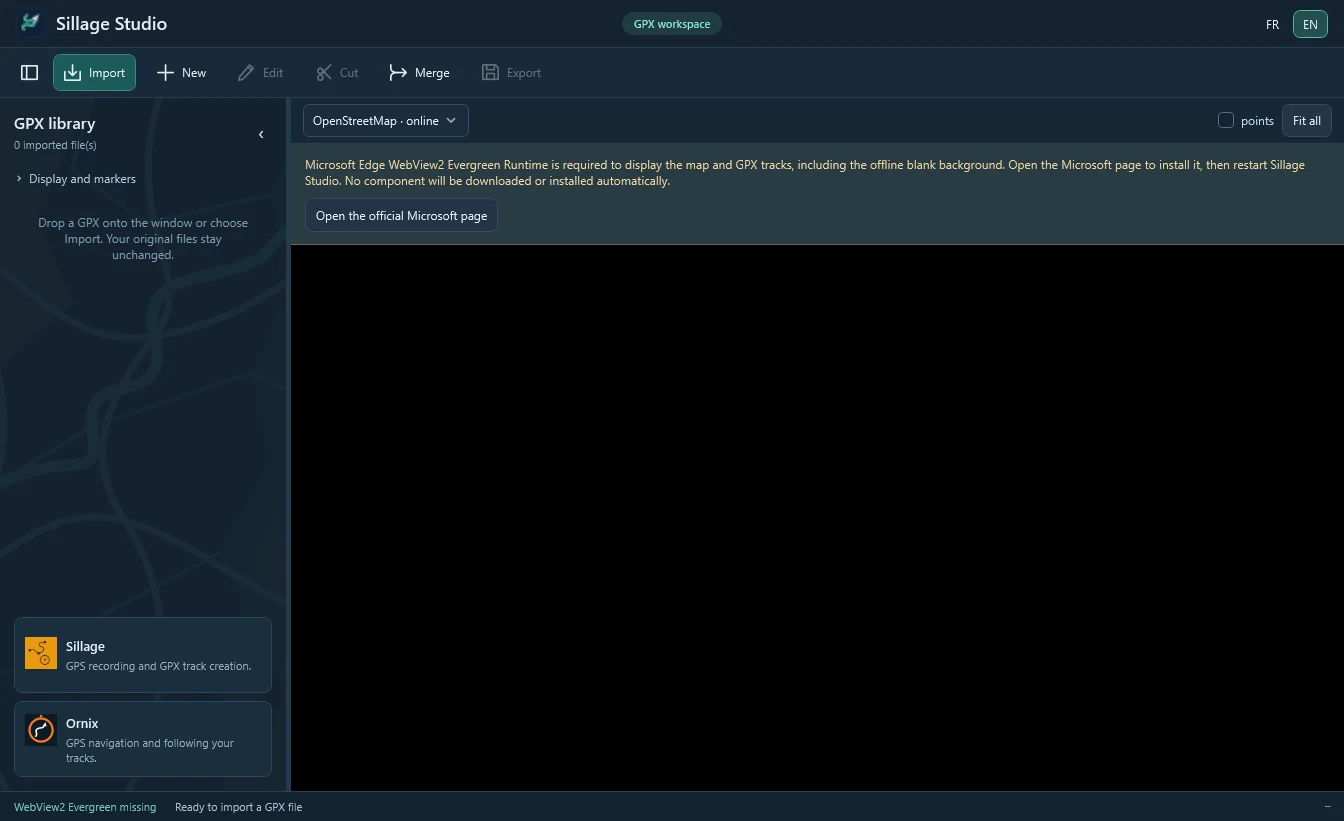
- Click Open the official Microsoft page: Microsoft’s WebView2 page opens in your browser.
- Download and install the Evergreen runtime suited to your PC. For an offline PC, Microsoft also offers a standalone installer.
- Restart Sillage Studio. The application never downloads or installs anything automatically.
Getting to know the interface
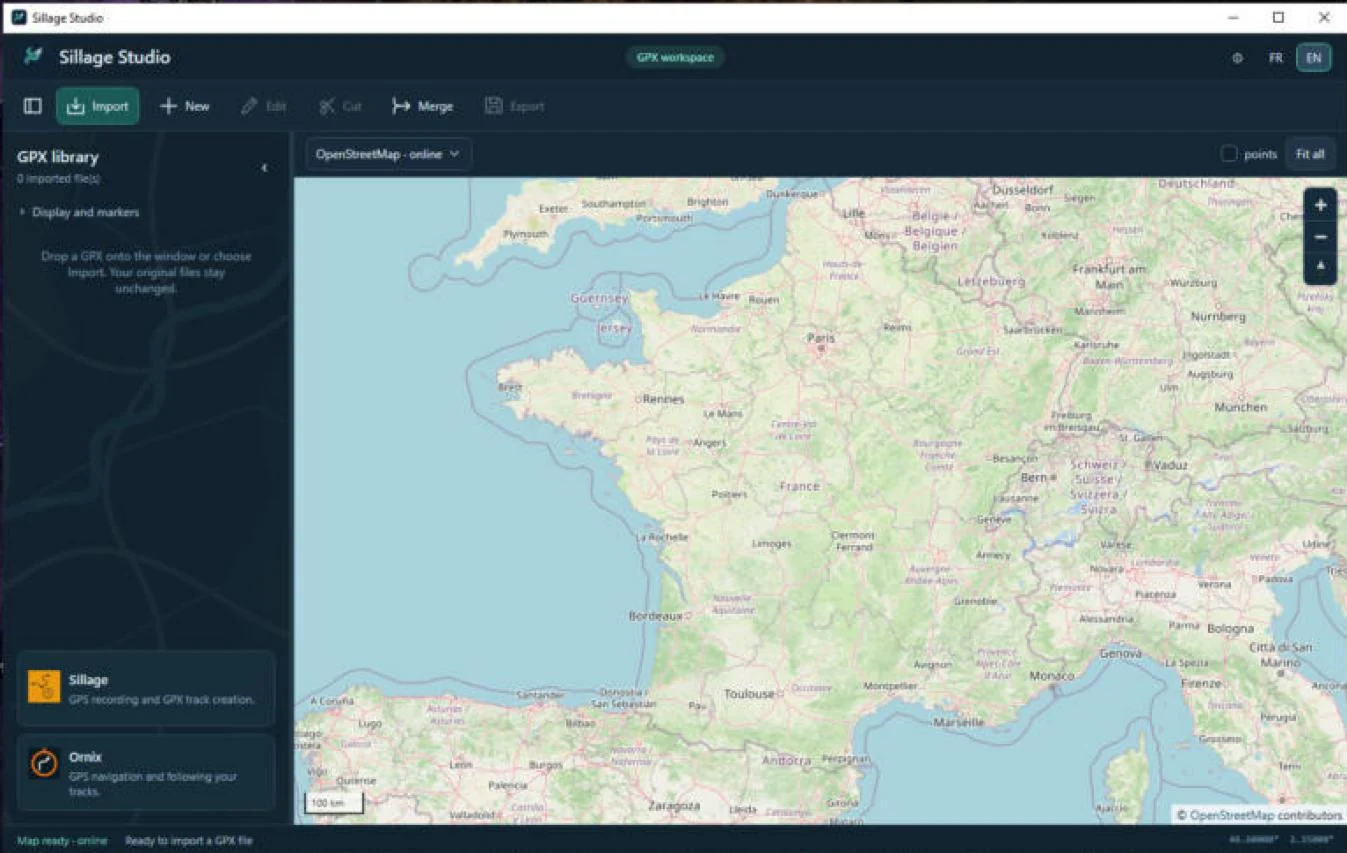
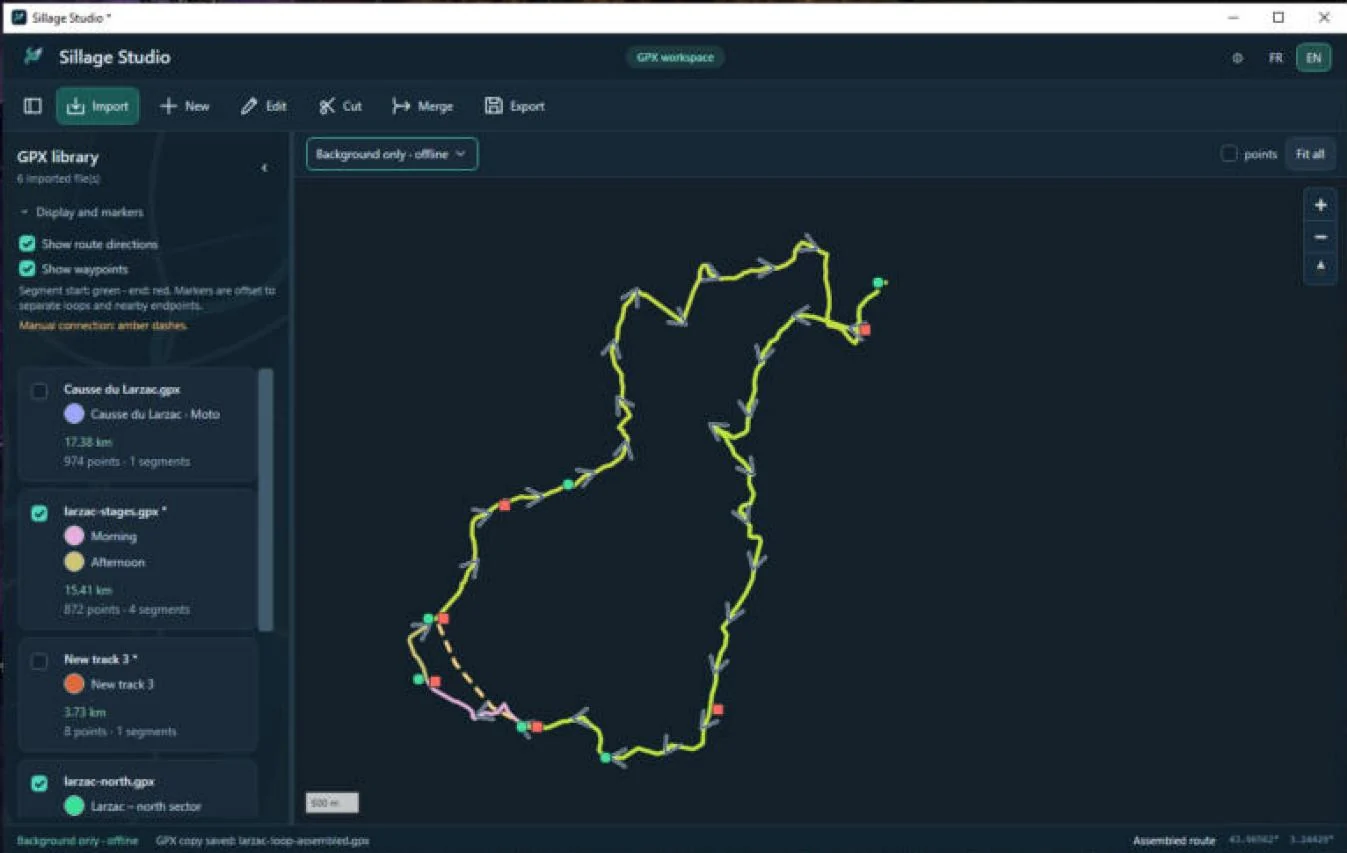
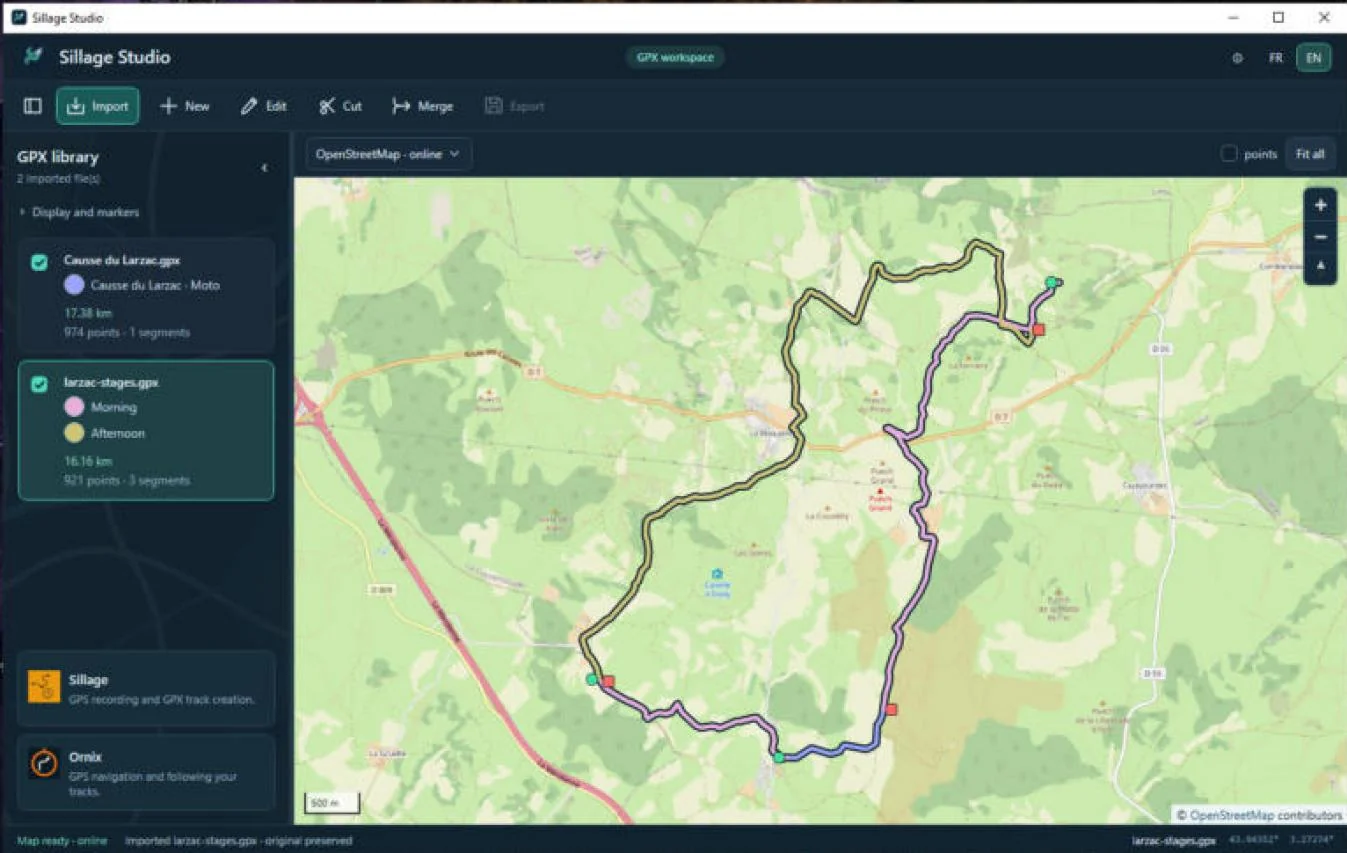 12345
- Header: logo, name, current mode (for example GPX workspace), the ⓘ About button and the FR / EN language switch.
- Toolbar: library button, Import, New, Edit, Cut, Merge, Export. A command that is unavailable in the current situation is grayed out.
- GPX library on the left: imported or created documents, with visibility, colors and statistics.
- Map in the center: background choice, points, Fit all, zoom + / − and bearing reset. Pointer coordinates appear at the bottom right.
- Status bar: map status, last action message, active document, coordinates. Read it when an operation is refused.
- Context panel on the right (not shown here): appears only when creating, editing, selecting an A/B portion or merging. See for example Creating a track.
The button to the left of Import collapses the library to enlarge the map; the ‹ arrow at the top of the library does the same. Drag the separator to resize the library. There is no File/Edit menu bar.
At the bottom of the library, two cards present Sillage and Ornix; clicking one opens its page on softlogics.net in your browser. They shrink or disappear when space runs out.
Switching language with FR / EN translates the interface immediately. On first launch, the language follows Windows (English for other languages).
Importing and viewing GPX files
Importing
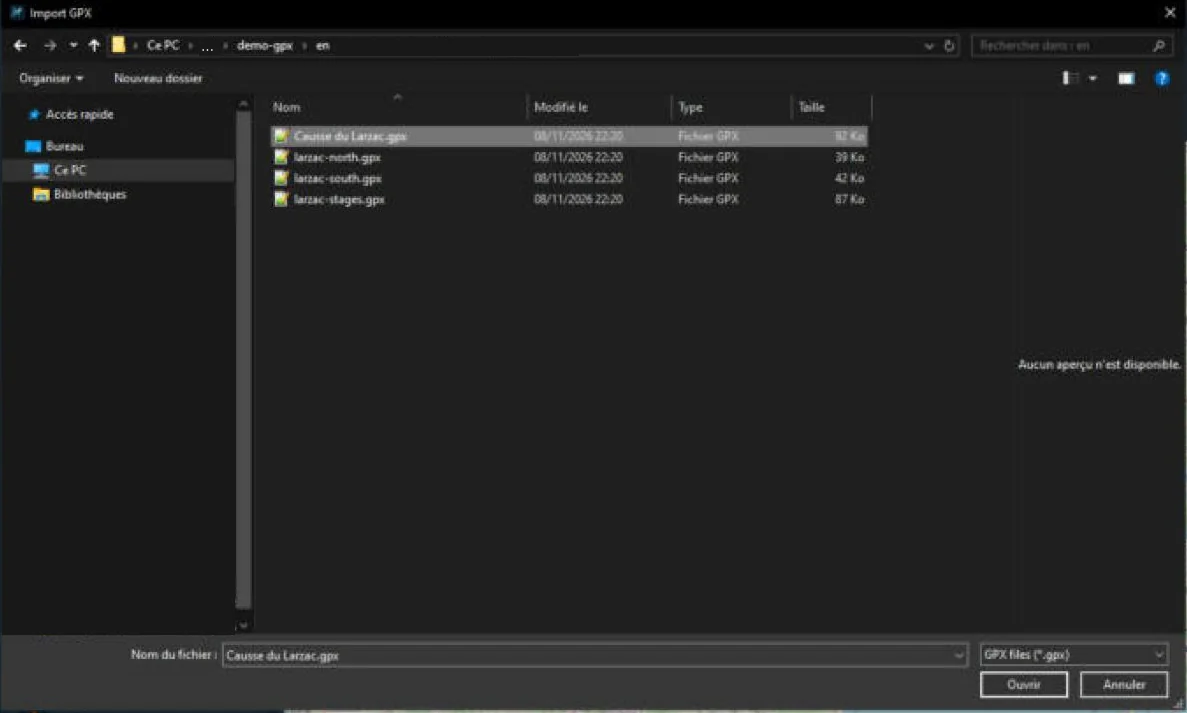
- Click Import. In the Windows dialog, select one or more
.gpxfiles (Ctrl+click for multiple selection), then Open. - You can also drag GPX files from File Explorer and drop them onto the Sillage Studio window.
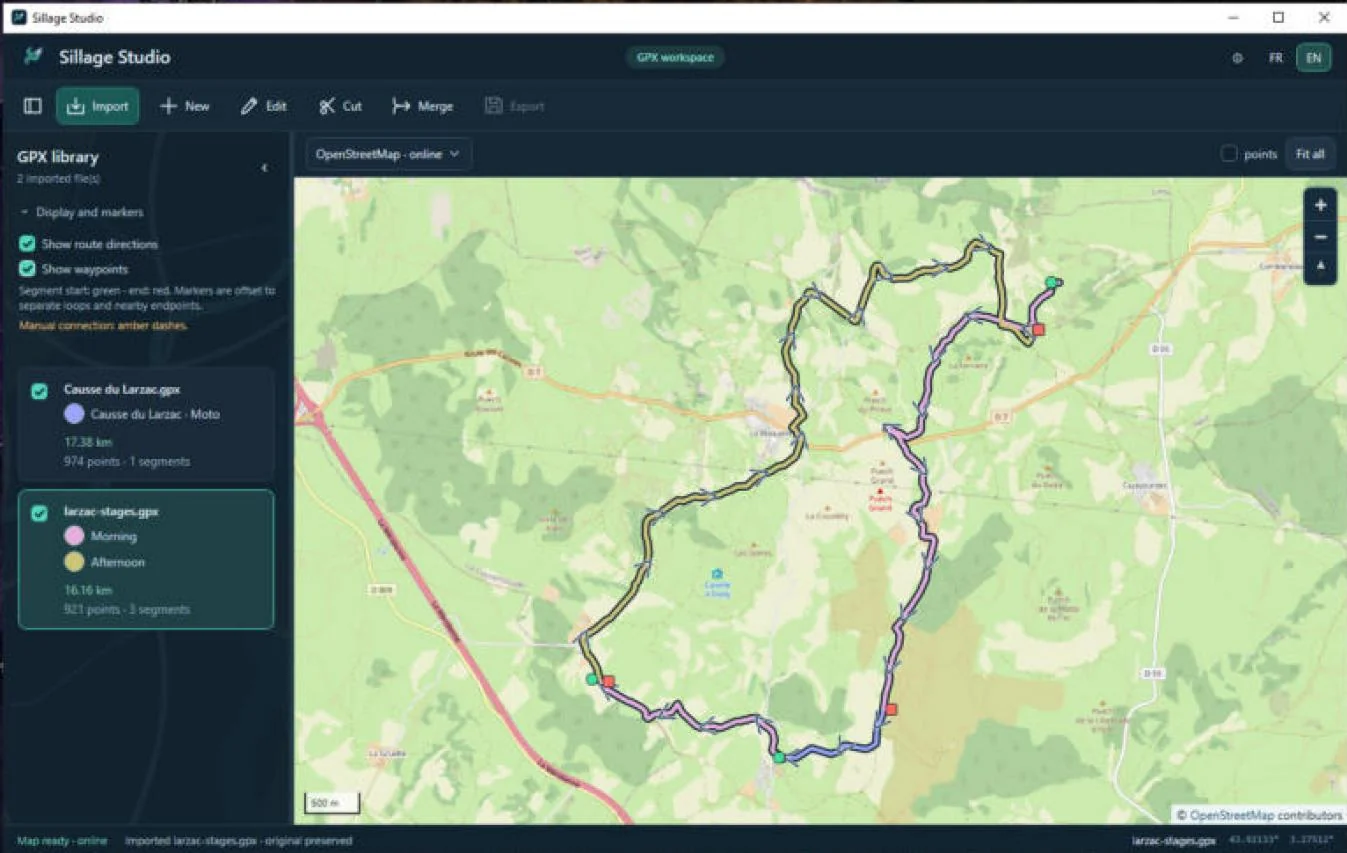
- Each file appears in the library and the map frames the data. The status bar confirms: Imported … · original preserved.
Sillage Studio reads GPX 1.0 and GPX 1.1 files up to 64 MiB each. An empty, invalid, too large or inaccessible file, or one without any displayable point, is refused with a message in the status bar. Other formats (FIT, KML, CSV, ZIP…) are not imported.
The library
For each document, the library shows:
- a visibility checkbox that shows or hides the whole document on the map, without moving the view or removing the file;
- the name, followed by an asterisk
*if it has unsaved changes; - one color dot per track or route (see Colors);
- the distance in km, and the number of points and segments.
Click a document to select it: it becomes the active document for commands. The library is an in-memory working list; it is not restored on the next launch.
Understanding the statistics
- The distance adds up horizontal distances between neighboring points of each segment and each route. Gaps between segments are not counted. It is neither a road distance nor corrected for terrain.
- The point count includes track points, route points and waypoints.
- The segment count covers track segments, not GPX routes.
Sillage Studio 1.0.0 has no elevation profile, climb, speed or duration figures.
Navigating the map
- Drag to pan; use the mouse wheel or the + / − buttons to zoom.
- Fit all reframes the map on all visible documents (and on the preview while merging).
- The compass button under the zoom controls puts north back up.
- The menu at the top left of the map selects the background: OpenStreetMap · online or Background only · offline (see With or without Internet).
Display, markers and colors
The Display and markers section at the top of the library expands with a click. These settings affect the display only: they never change the GPX files.
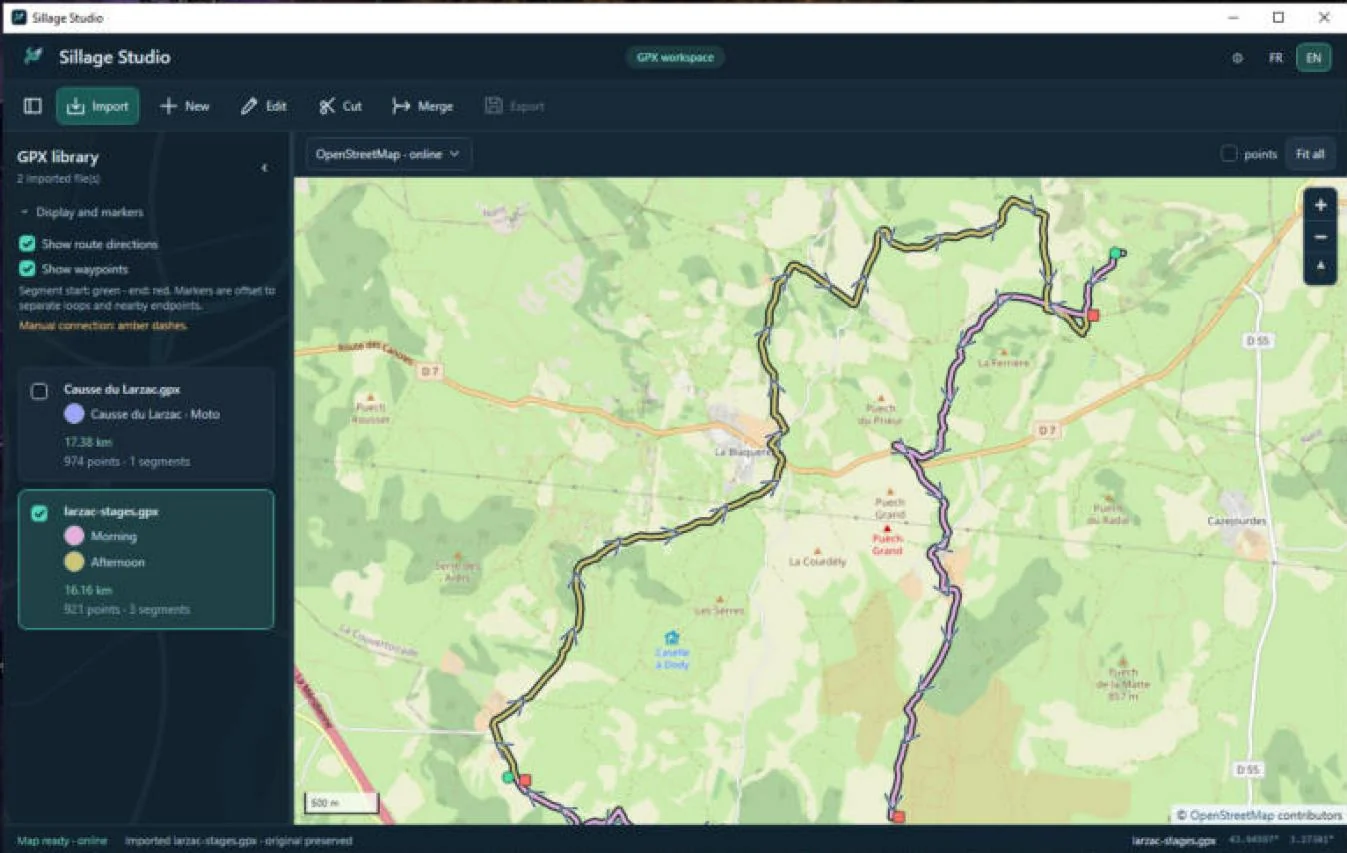
- points checkbox above the map (point preview): from zoom 14, shows a sample of up to 1,000 track and route points. Off by default. Sampling never removes points from the file.
- Show waypoints: amber markers, about one in ten from zoom 10, one in three from zoom 13, all from zoom 16. Off by default.
- Show route directions: dark-blue chevrons following the real point order within each segment, hidden below zoom 9.
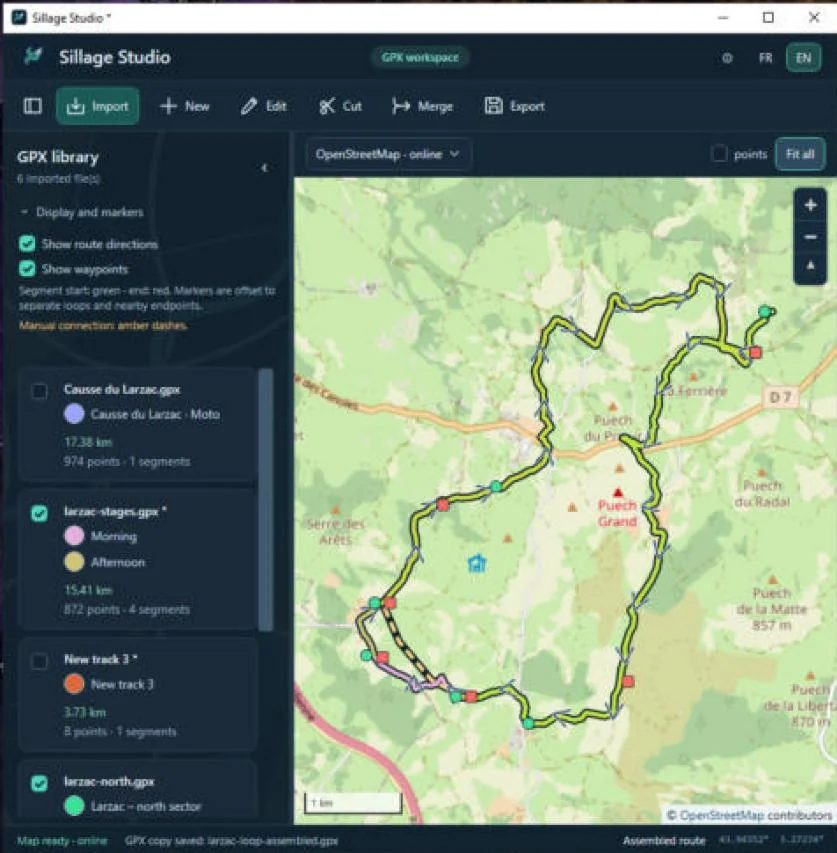
Start, end and gaps
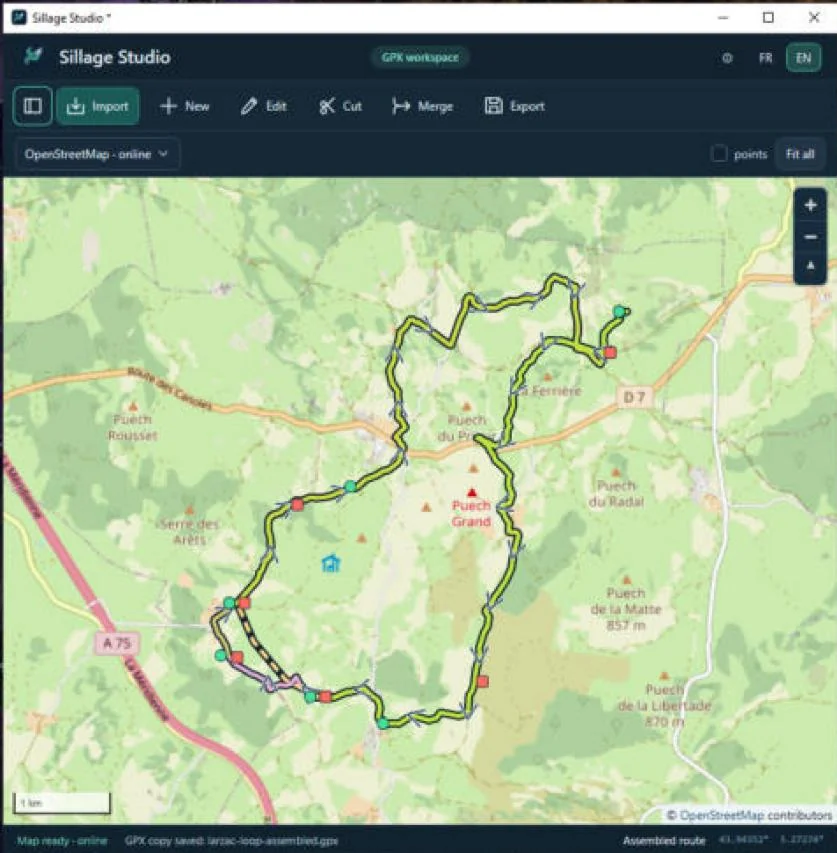
Each segment has its own green start and red end marker. On a loop, or when two endpoints are close, markers are slightly offset to stay readable; GPS coordinates do not change.
A gap between two segments stays visible: no line artificially joins the end of one segment to the start of the next. Manual links created in Sillage Studio appear as amber dashes.
Colors
A color is assigned automatically to each track and route. To change it:
- Click the track’s color dot in the library.
- Pick a palette color or type a #RRGGBB code. The preview updates.
- Click Apply, or Cancel to keep the current color.
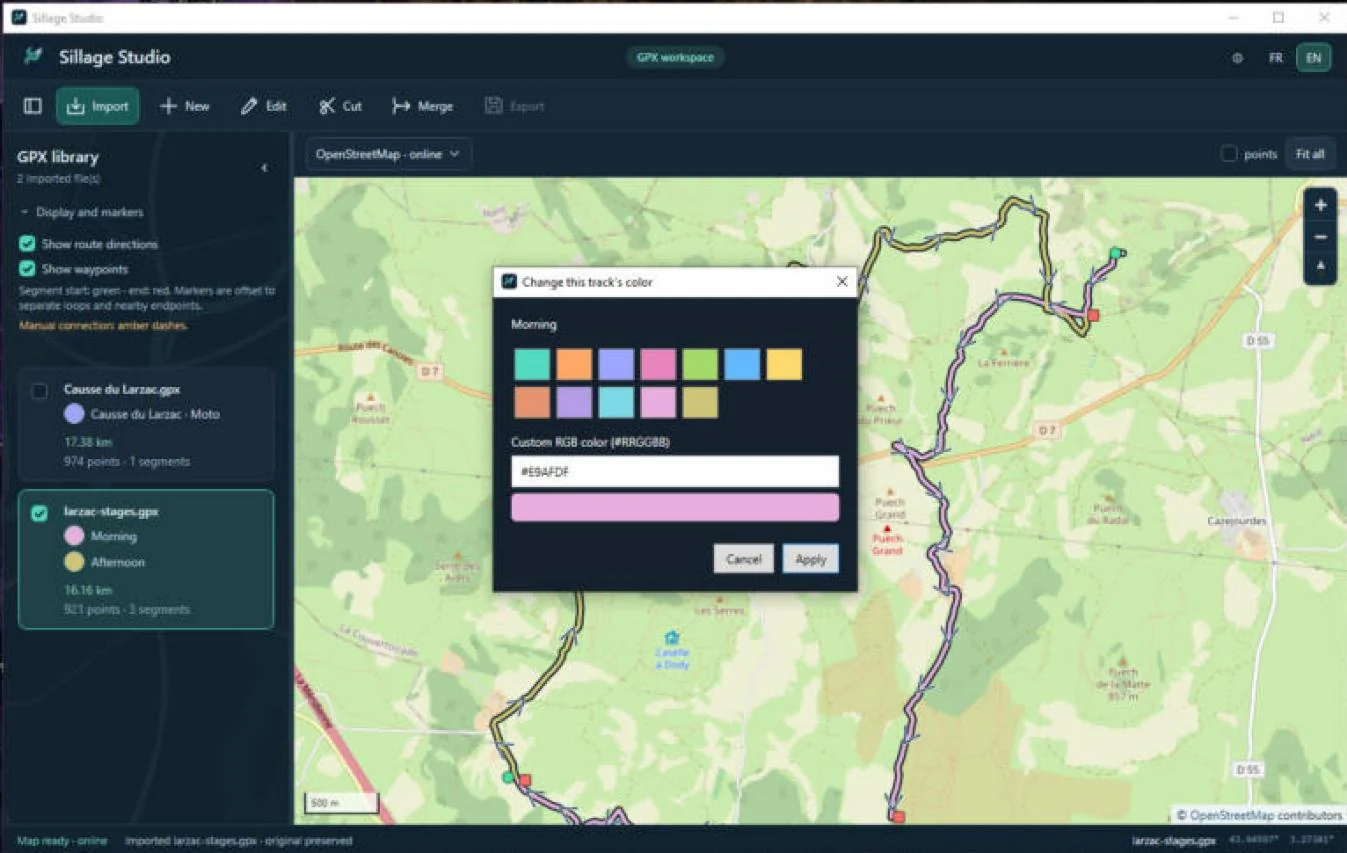
Colors are remembered on this PC (see Settings and data) and are not written into GPX files. Two identical copies of a file share their colors; a file changed by another program may get new colors. The palette is finite: with many tracks, some colors may look alike.
Creating a track
You can draw a new track by clicking on the map. Each click adds a GPS point; neighboring points are joined by a straight line. There is no route calculation: the line does not automatically follow paths.
- Finish any editing or merge in progress, then click New.
- Enter the Track name (1 to 200 characters).
- Click the map to place points in order. The panel shows the number of points and the distance.
- Undo last point removes the last point placed.
- Click Finish or press Esc. The track joins the library, marked with an asterisk: it is not saved yet.
- Select it, then Export to save it to a new file (see Exporting).
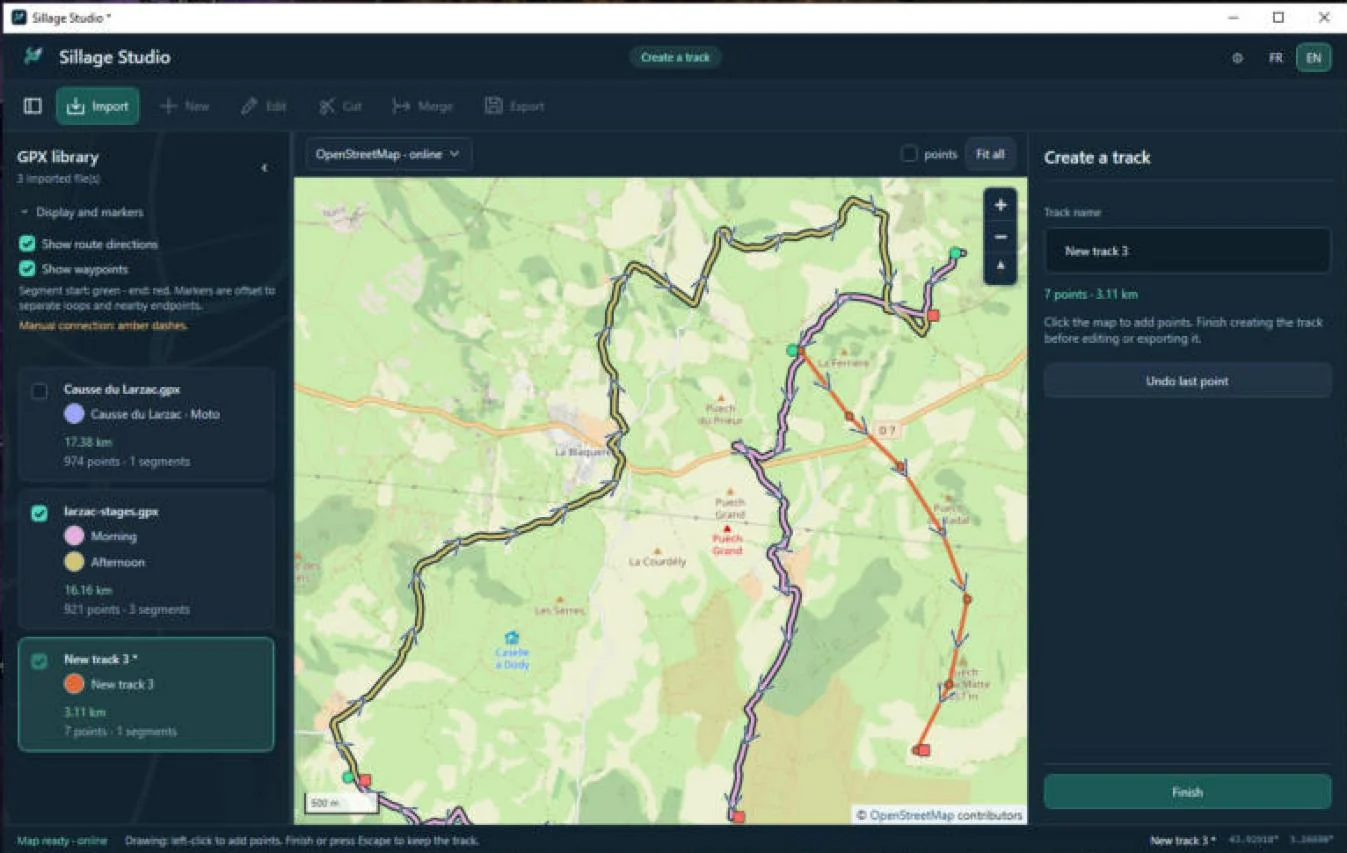
Created points have no elevation or time. While creating, only Undo last point is available: Ctrl+Z and Redo do not apply.
Editing points
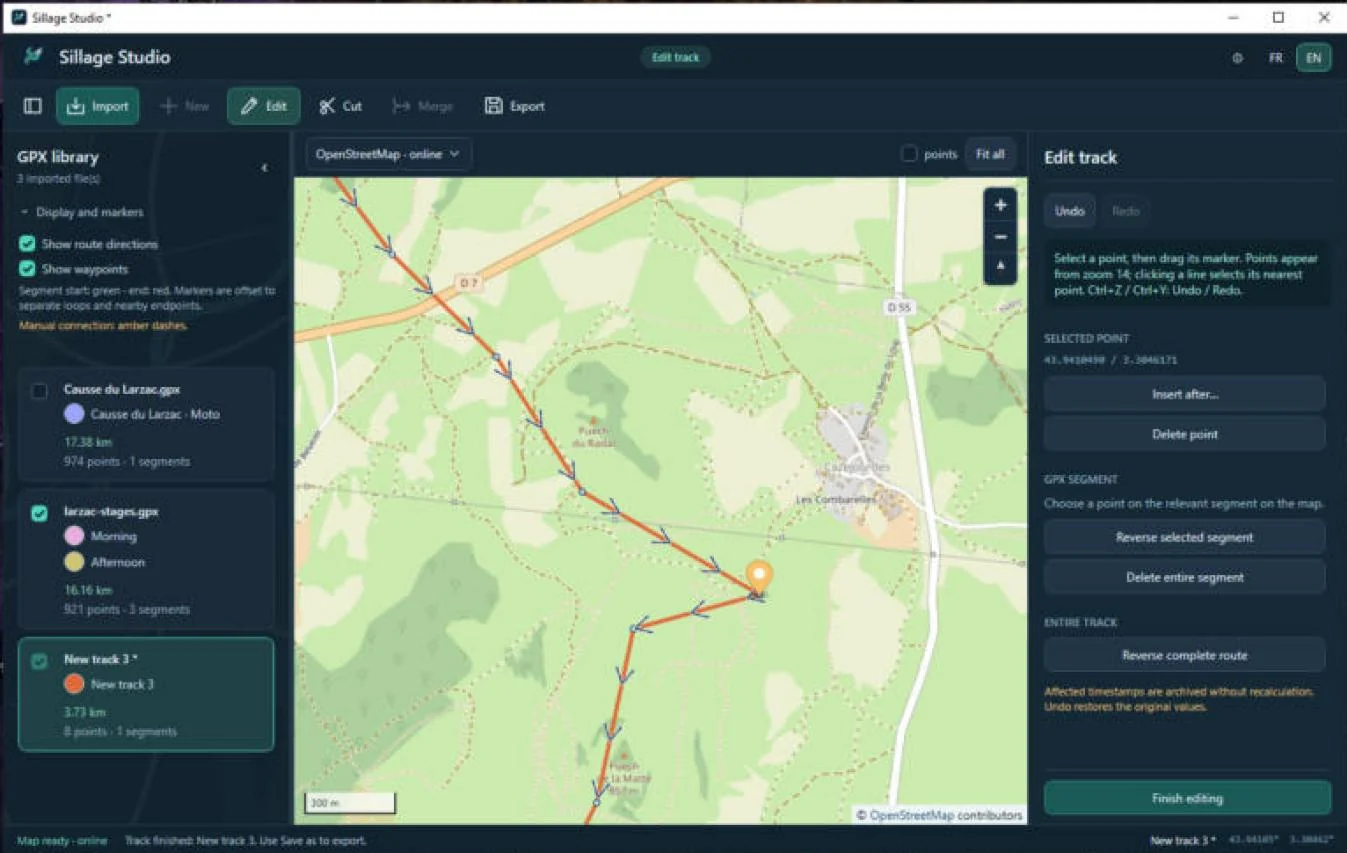
Edit opens a working copy of the selected document. Changes apply to track and route points; standalone waypoints cannot be edited.
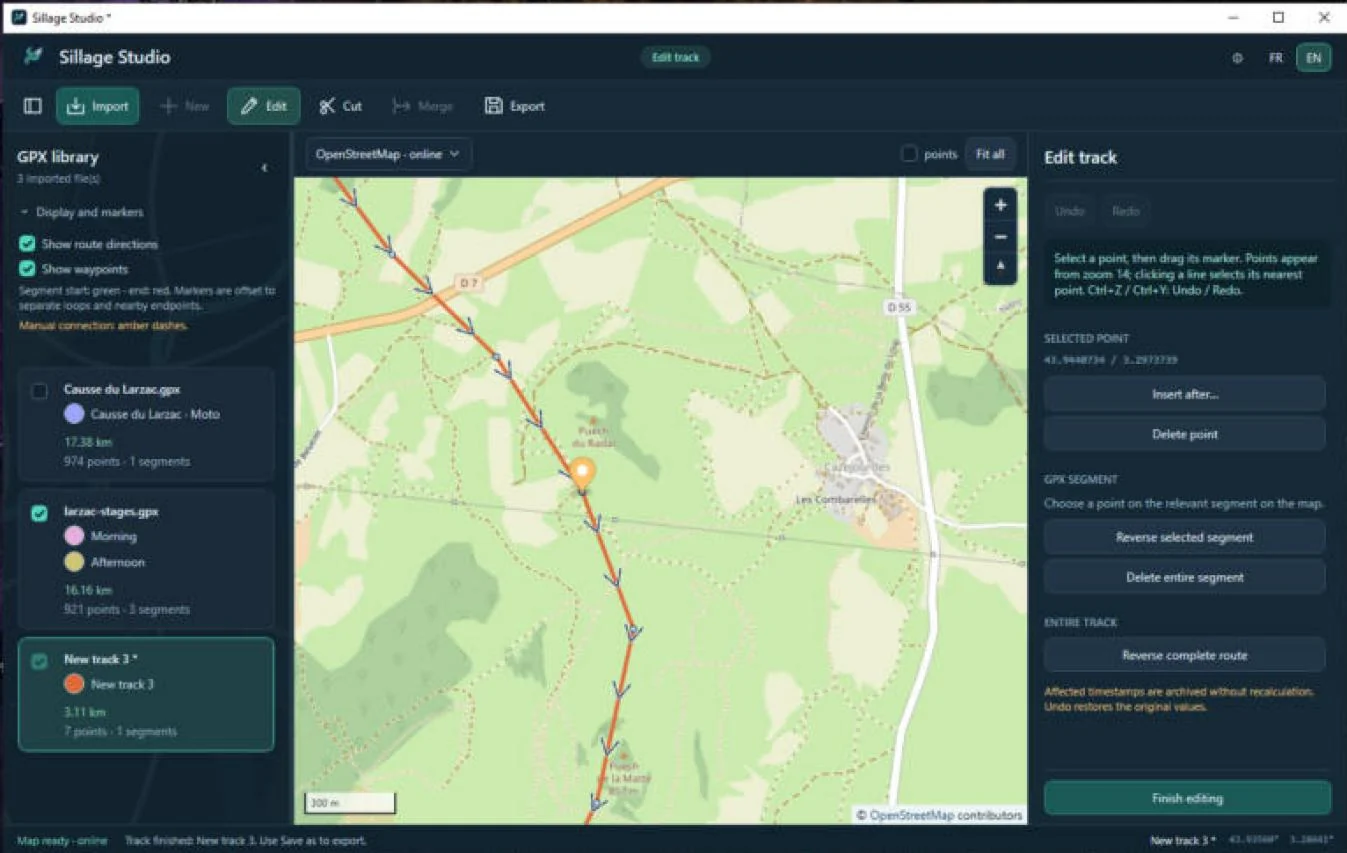
- Select a document in the library, then click Edit. The mode becomes Edit track.
- Zoom in enough: editing points appear from zoom 14. Click a point, or a line to select its nearest point.
- Drag the selected point’s marker to its new position. The distance updates.
Inserting and deleting a point
- Insert: select a point that has a next point in the same segment, click Insert after…, then click the map where you want it. The new point goes between the two. Esc cancels insertion. You cannot insert after the last point of a segment or between two segments.
- Delete: Delete point removes the selected point; its two neighbors are then joined. There is no confirmation: use Undo if needed.
Finishing
Undo / Redo (or Ctrl+Z / Ctrl+Y) move through the history. Then click Finish editing or press Esc. Finishing does not save: export a new copy.
A/B portions, cutting and deleting
A portion is the run of points between two points A and B in the same segment, A and B included. Cut lets you delete or reverse it.
- Select the document, then click Cut: editing opens if needed and the mode becomes A/B portion.
- Click point A, then point B in the same segment. The order of the two clicks does not change the portion.
- The portion is highlighted; the panel shows its point count and distance.
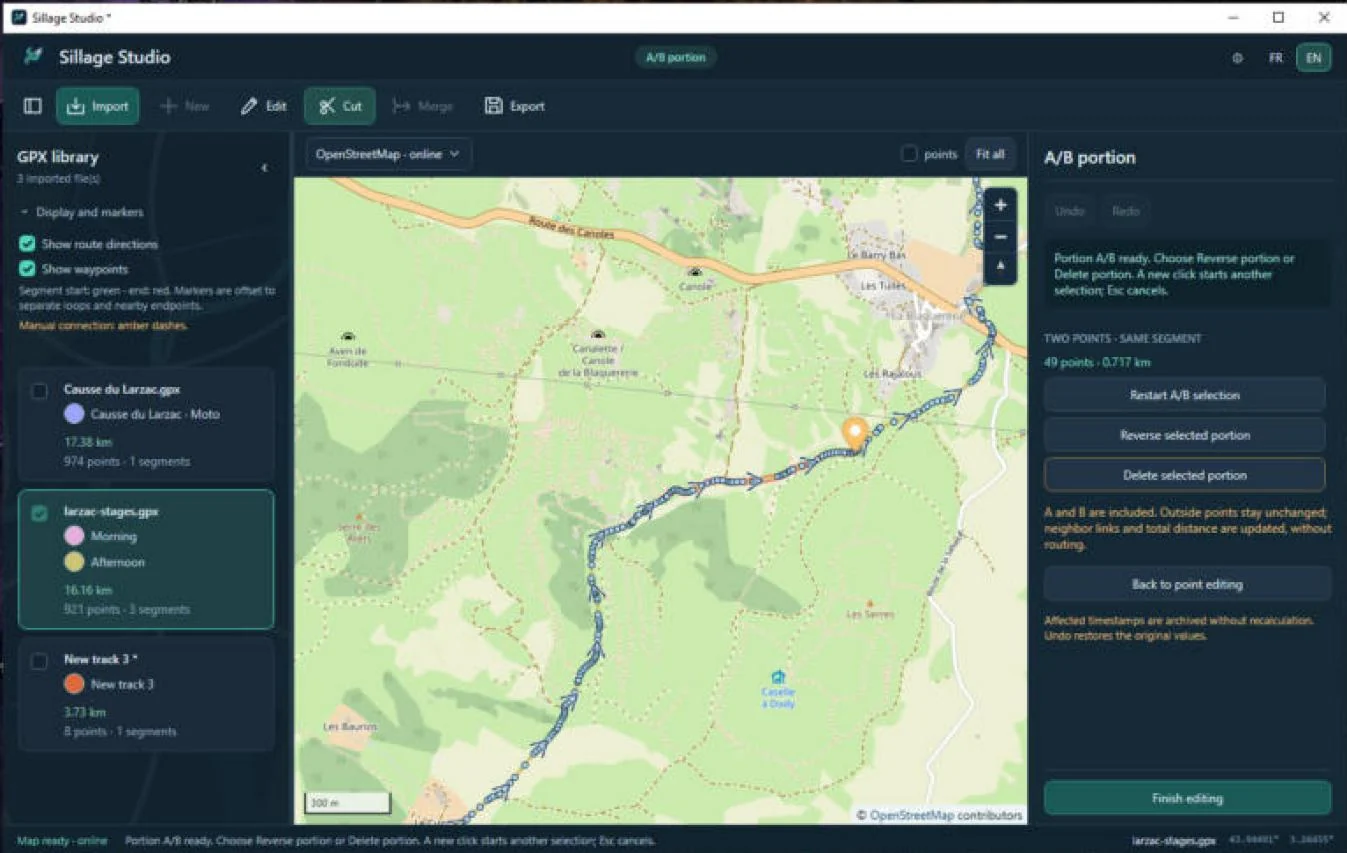
- A point B in another segment is refused: the status bar asks you to choose both endpoints in the same segment.
- A third click restarts the selection from A; Restart A/B selection does the same.
- Esc or Back to point editing leaves the A/B selection.
Deleting a portion
- With a portion selected, click Delete selected portion.
- Read the confirmation: A and B are deleted with the portion, and the remaining parts will stay separate. Click Yes (shown as “Oui” on a French-language Windows, see Confirmation buttons).
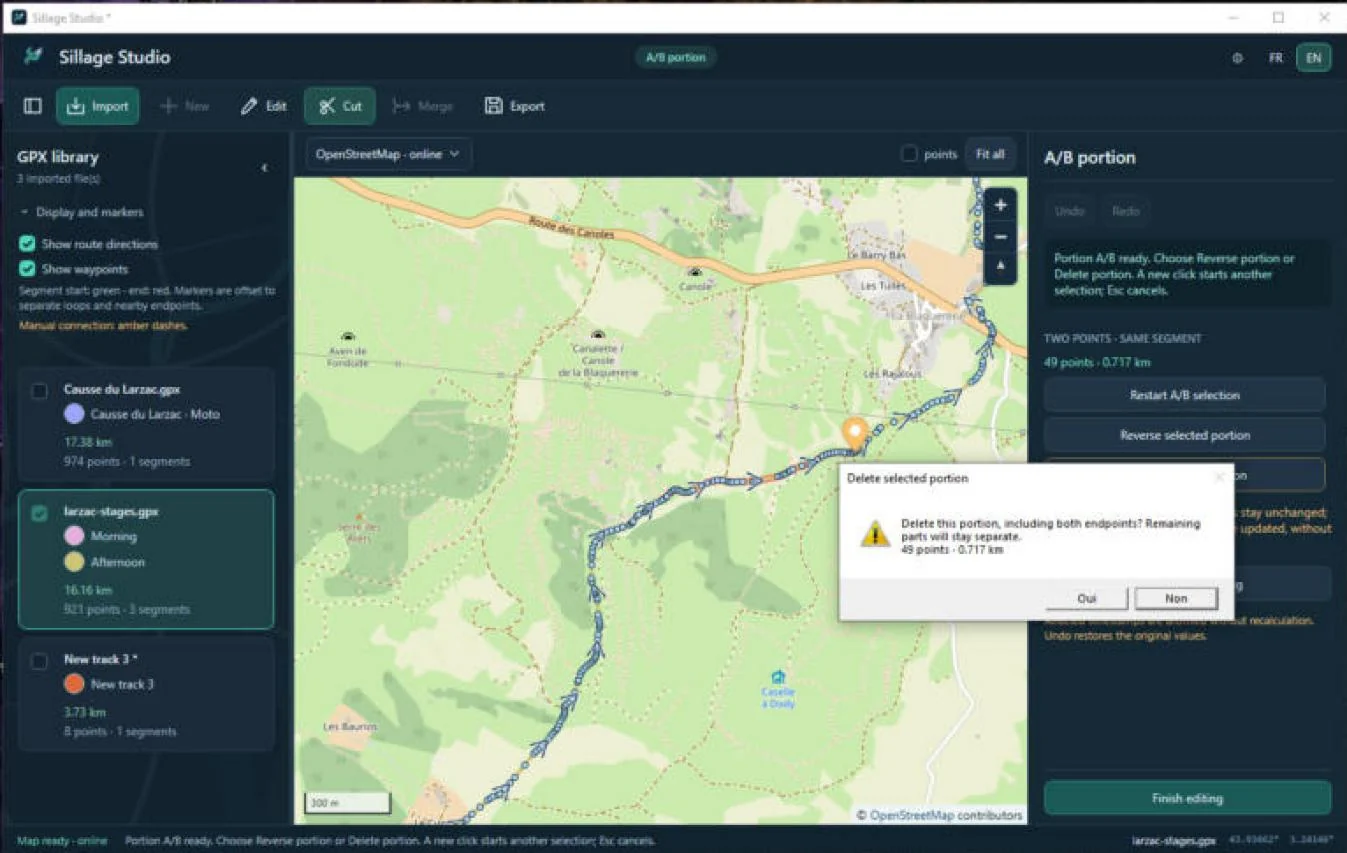
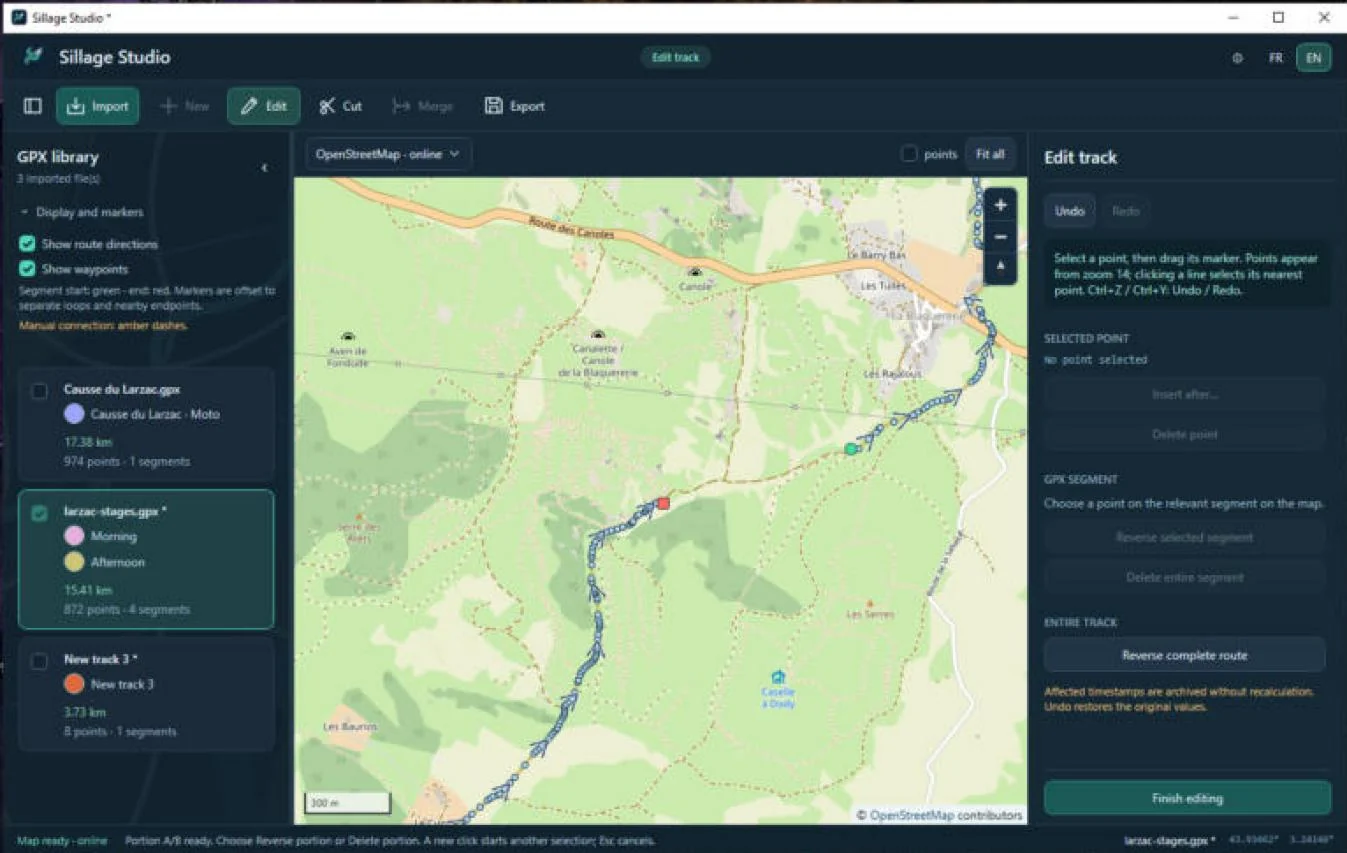
- Portion in the middle of a segment: two separate fragments remain, never artificially joined.
- Portion at the start or end: only the remaining part is kept.
- Portion covering the whole segment: the segment is deleted.
Deleting an entire segment
In point editing, click a point of the segment, then Delete entire segment and confirm. Only that point’s segment is deleted, not the whole document.
In every case, Undo goes back. Then finish editing and export a copy.
Reversing direction
Three commands reverse the point order, each with a different scope:
| Command | Scope | How to use it |
|---|---|---|
| Reverse selected portion | Points from A to B inclusive | Select an A/B portion (at least two points). Outside points do not move. |
| Reverse selected segment | One segment | In editing, click a point of the segment. Other segments stay unchanged. |
| Reverse complete route | The whole active document | The order of tracks, segments and points is reversed; GPX routes too. Waypoints and metadata stay in place. |
The segment and complete-route reversal buttons are in the editing panel (see the figure in Editing points).
Direction arrows and start/end markers follow the new order. Gaps between segments stay open.
Reversing a portion can create long links to neighboring points: check the map and the distance. Passability is never checked.
Merging tracks
Merging assembles several tracks, from one or more files, into a new GPX 1.1 document. The source documents are not changed.
- Import the source files. Outside any creation or editing, click Merge. The mode becomes Merge tracks.
- Name the result. In Available tracks, choose a track then Add track. Repeat for at least two tracks. You can still import files while merging.
- In Selected tracks — assembly order, select a track and use Move up, Move down, Reverse or Remove.
- For a track followed by another, the panel shows the straight-line gap between its end and the next start, and the nearest following track. Apply this order / direction applies this suggestion.
- Choose the connection after the selected track (see below) and check the live preview on the map.
- Click Create assembled route. The new document joins the library; select it and Export.
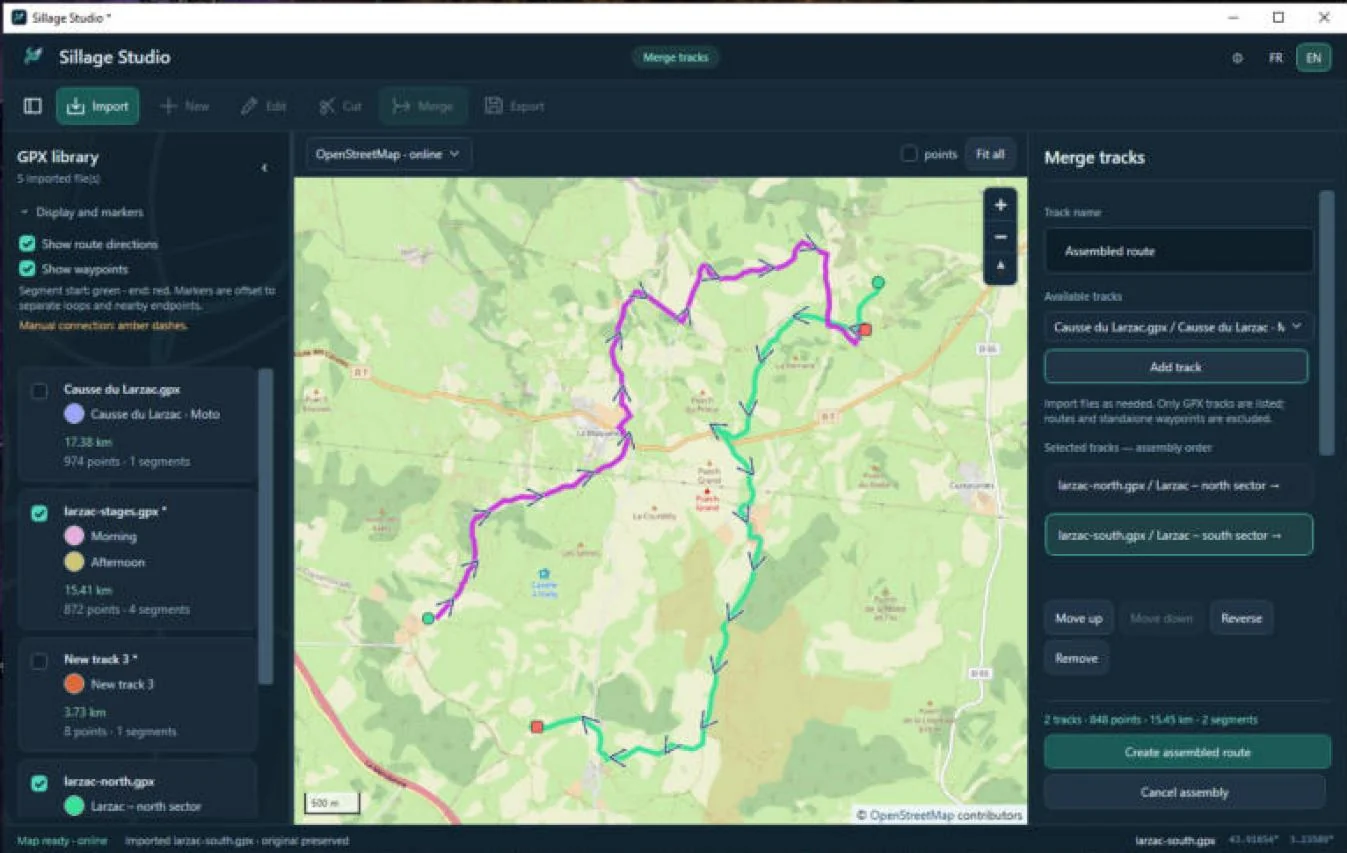
Only tracks are offered: GPX routes and standalone waypoints are excluded from the assembly. The suggestion only looks among already selected tracks placed after the current one; it is not a global optimal-order calculation.
Linking two tracks
- No connection: tracks stay independent segments (or an existing link is removed).
- Draw manual link: click at least one intermediate point on the map, then Finish link or Esc. The link joins the end of the selected track, your points, then the start of the next track, in an extra segment shown as amber dashes.
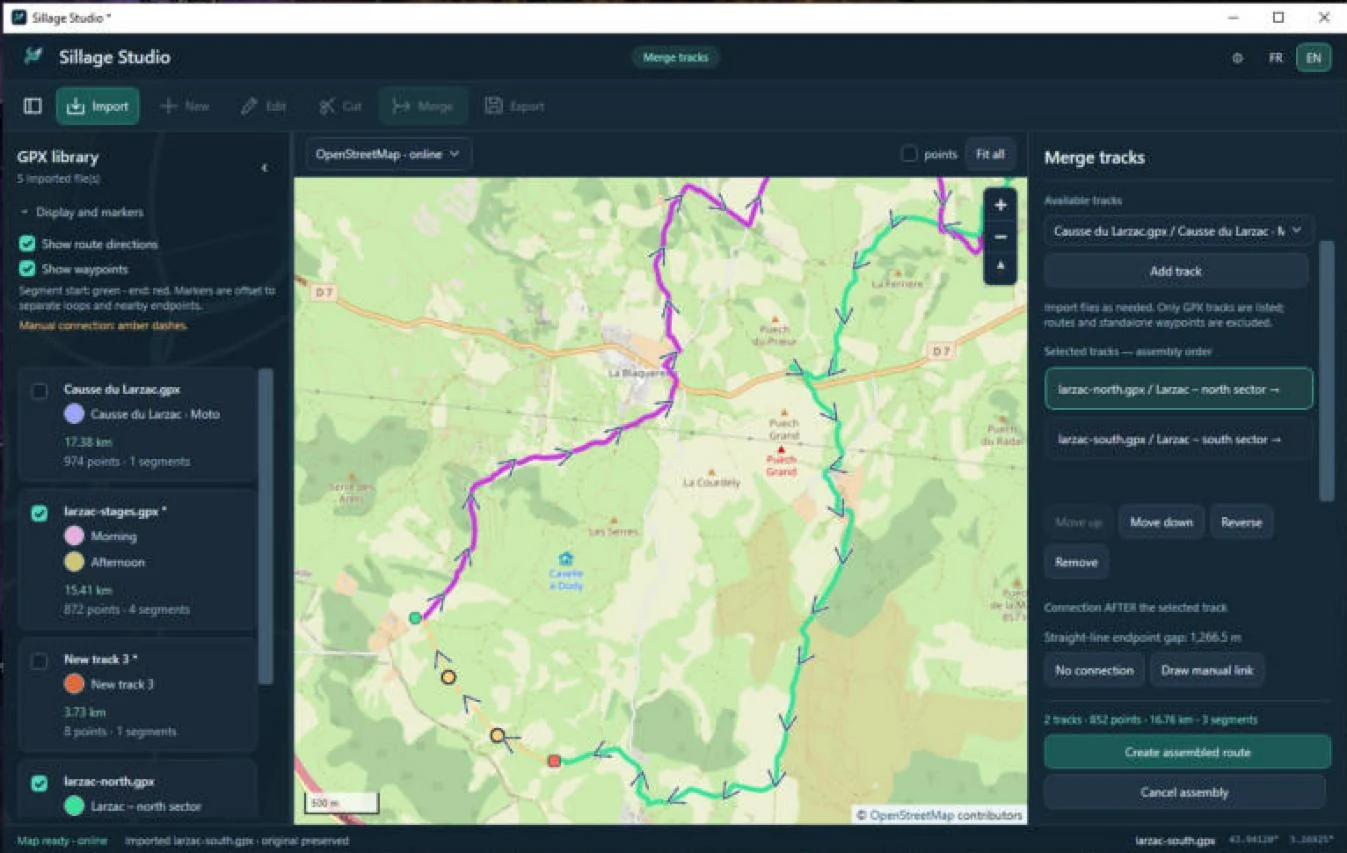
Undoing during a merge
- Ctrl+Z / Ctrl+Y undo and redo steps of the current merge.
- Adding, removing, reordering or reversing a track clears existing manual links; Undo restores them.
- Esc stops drawing a link but does not leave the merge. Cancel assembly abandons the assembly and keeps the sources.
- After Create assembled route, the merge is closed: the created document cannot be undone with Ctrl+Z.
GPX 1.1 points are copied with their data; GPX 1.0 points are converted to GPX 1.1. Source provenance is archived in the result’s extensions. Reversed tracks archive their times, and link points have no elevation or time. The resulting route has no guaranteed overall timeline.
Undo, redo and shortcuts
The undo history belongs to each edit or merge in progress. It is kept in memory and disappears when the application closes.
| Situation | Shortcut | Effect |
|---|---|---|
| Editing, A/B portion | Ctrl+Z | Undo the last operation |
| Editing, A/B portion | Ctrl+Y or Ctrl+Shift+Z | Redo |
| Editing | Esc | Cancel the insertion or A/B selection in progress; otherwise finish editing |
| Merge | Ctrl+Z · Ctrl+Y | Undo · redo within the merge |
| Merge | Esc | Finish drawing a link (the merge continues) |
| Creating | Esc | Finish drawing, keeping the points |
Colors, language, visibility and display options are not part of the history.
Exporting and preserving your files
Export saves the selected document to a new GPX file. The button is active for a created track, a merge result or a document opened for editing. A document that was only imported cannot be exported as is: open it with Edit, then finish (even without changing anything).
- Finish creating, editing or merging, then select the document.
- Click Export. The Save as… dialog opens.
- Choose an accessible folder and a filename that does not exist yet, then save.
- Check the GPX copy saved: … message in the status bar.
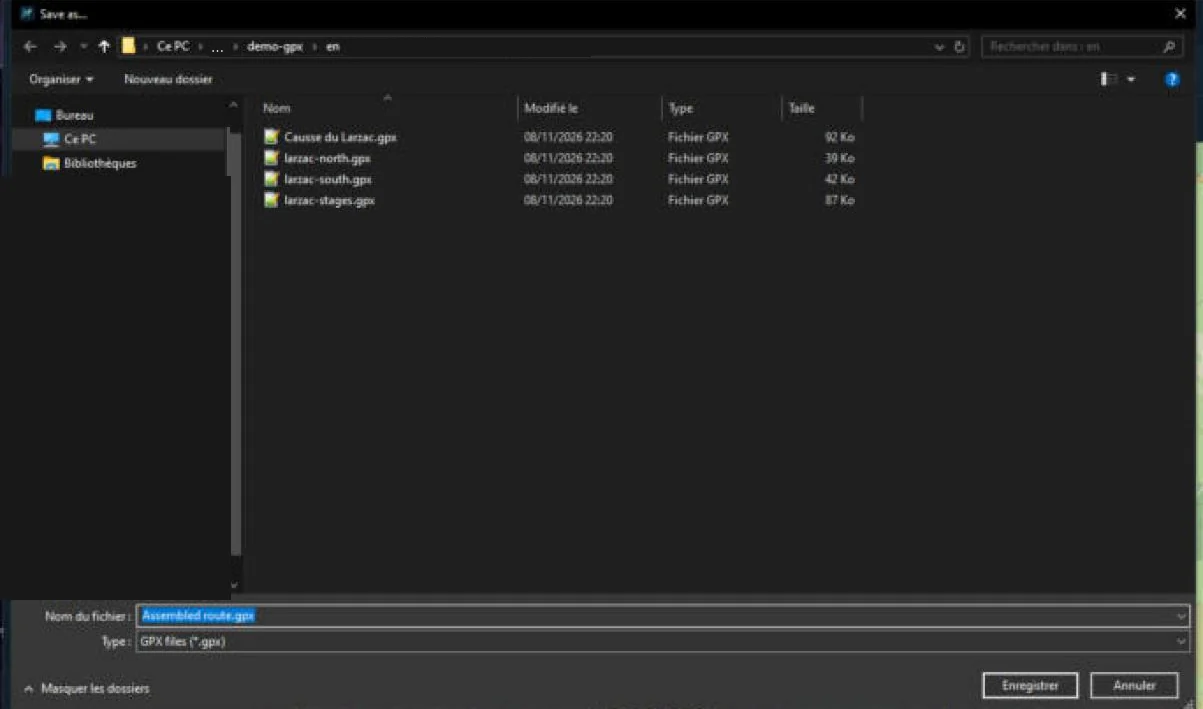
What is preserved
- An edited document keeps its GPX version (1.0 or 1.1); a created or merged track is saved as GPX 1.1.
- Metadata, extensions, elevations and times of kept points are preserved. Deleted points disappear with their data.
- The exported file is not necessarily byte-for-byte identical to the original: its useful structure is preserved, but XML formatting may change.
- The 64 MiB limit also applies to export: a very large assembly may exceed it.
For an important route, re-import the exported copy and check its gaps and links, then test it in the GPS software that will use it.
Closing without losing work
There is no autosave and no session restore. If documents marked * are unsaved when closing, an Unsaved GPX changes warning appears: choose No to go back and export, or Yes to close and discard the changes. Original files stay unchanged in every case.
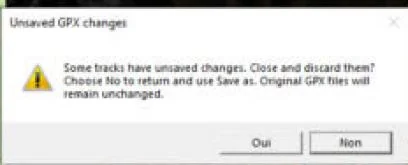
With or without Internet
Sillage Studio works offline. Only the OpenStreetMap background needs Internet.
| With Internet | Without Internet | |
|---|---|---|
| Map background | OpenStreetMap · online | Background only · offline: plain background, no geographic map |
| Import, editing, merging, export | Yes | Yes |
| About links and cards | Open the browser | The browser will not be able to load the page |
Sillage Studio does not offer downloadable offline maps: any WebView2 cache is not a guaranteed offline map. Internal files (interface, scripts, icons, languages) ship with the application.
If the status bar shows Map unavailable, check the connection or switch to Background only · offline. This message does not mean WebView2 is missing.
Settings and data
Sillage Studio has no settings window: settings are made directly in the interface.
| Item | Location / lifetime |
|---|---|
| Track colors | %LOCALAPPDATA%\SillageStudio\track-colors.json |
| Map profile and cache (WebView2) | %LOCALAPPDATA%\SillageStudio\WebView2 |
| Source GPX files and exports | The folders you choose; never moved automatically |
| Library, history, visibility, display options | Current session only |
| Language | Follows the Windows language at launch; FR / EN can be switched at any time |
If the color file cannot be read, the application starts normally with fallback colors and says so (Colors apply for this session…). It does not delete the faulty file.
Troubleshooting
| Symptom | What to do |
|---|---|
| WebView2 Evergreen missing | Install the Evergreen runtime from the Microsoft page, then restart (see WebView2). |
| WebView2 initialization failed | Check the WebView2 components, that every file from the ZIP was extracted and that your user profile is accessible, then restart. This is distinct from an unavailable online map. |
| Blank map, Map unavailable | Check the Internet connection or choose Background only · offline. |
| The application does not start from the ZIP | Extract the whole ZIP to a local folder and run the executable from there, without moving it on its own. |
| Unable to import …: invalid, empty or inaccessible GPX file | Check that it is a GPX 1.0 or 1.1 file containing points, under 64 MiB, and not locked by another program. |
| Export is grayed out | Open the document with Edit then finish, or finish the creation/merge in progress. |
| Unable to save… | Choose a folder you can write to and a filename that does not exist yet. |
| A command stays grayed out | Select a document, or first finish the current mode (creating, editing, merging). Read the status bar. |
| Editing points do not appear | Zoom in to level 14 or more. |
| Could not open the default application. | No default browser or email application is configured in Windows. Visit softlogics.net or write to contact@softlogics.net from your usual email. |
| Truncated text at 125–200 % scaling | Enlarge the window or collapse the library. The window has a minimum size; not every scaling setting has been checked yet. |
Formats and limits
- Formats read: GPX 1.0 and 1.1, 64 MiB maximum per file. No full XSD validation on import.
- Times moved by a reversal are archived in the
urn:sillage-studio:merge:1extension (originalTime). Manual links are marked by a Sillage Studio extension; a link created by other software is not recognized as such. - Third-party software may ignore these extensions. Compatibility with every GPS device or program is not guaranteed: test your exports.
- Performance depends on file size, number of documents and hardware.
What Sillage Studio 1.0.0 does not do
To avoid confusion, the following features are not available:
- route calculation, off-road routing, snapping to roads, guidance, GPS recording;
- IGN, satellite or MBTiles maps, offline map download, address search;
- elevation profile, elevation correction, speed, duration;
- editing metadata or standalone waypoints; removing a file from the library;
- importing formats other than GPX, PDF or image export of the map, opening a GPX by double-click;
- account, cloud or Android sync, autosave, session restore;
- automatic update of the ZIP version, automatic installation of WebView2.
About and contact
The discreet ⓘ button in the header opens the About window: logo, version, publisher Soft_Logic and the Free application mention. Close or Esc closes it.
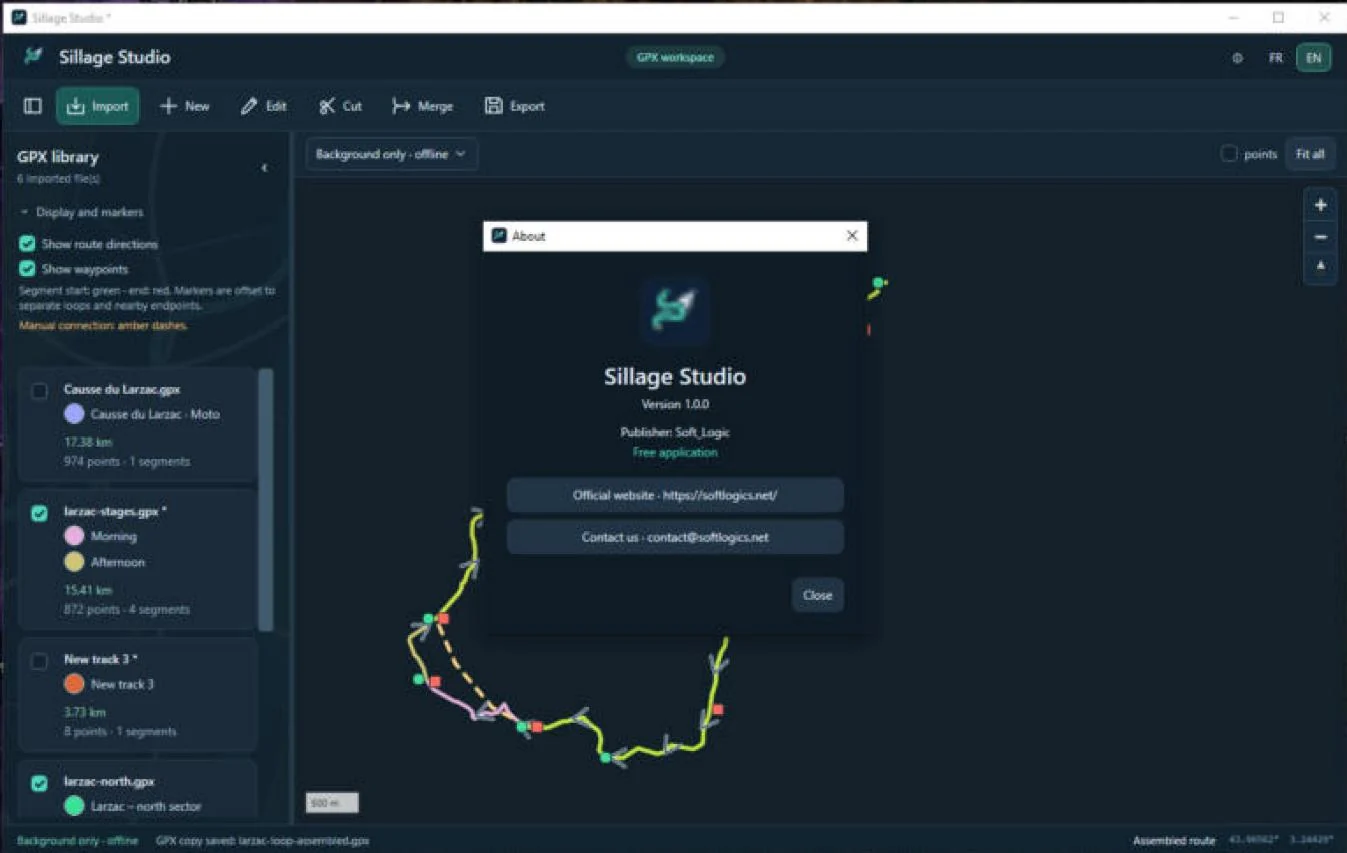
- Official website: https://softlogics.net, opened in your default browser.
- Contact us: contact@softlogics.net, opened in your default email application. Sillage Studio never sends messages itself.
To discover the Android apps: Sillage and Ornix on softlogics.net.
Credits and licenses
- Map background: data © OpenStreetMap contributors, available under the ODbL. Tiles are served by the OpenStreetMap Foundation and their use is subject to its tile usage policy. The attribution remains visible on the map and in this guide’s screenshots.
- Map rendering: MapLibre GL JS 5.15.0, BSD-3-Clause license. Full notices in
MapAssets/vendorin the application folder. - Microsoft .NET 10 (included, notices kept with the distribution) and Microsoft Edge WebView2 (Microsoft component installed separately).
- Sample tracks in the screenshots: “Causse du Larzac” loop recorded with Sillage and derived extracts, with no personal data.
- Windows, Microsoft Edge and Microsoft Store are trademarks of the Microsoft group of companies. Other trademarks belong to their respective owners.
Sillage Studio, Sillage and Ornix are Soft_Logic applications. Logos and icons: original Soft_Logic artwork.